How to Move a Filled Metal Raised Bed Without Losing the Soil
A 4-step method for relocating a full raised bed — soil intact, no shoveling — using cardboard, tarps, and an extra pair of hands.
How to move a raised garden bed sounds like one of those jobs that should involve a wheelbarrow, a sore back, and three hours of regretting your life choices. We’ve done it that way. Hated it. The better way — at least for smaller metal beds — is to move the bed like a giant soil lasagna: keep the soil block together, slide something under it, wrap it, and drag it to the new spot with one other reasonably patient human.
We used this method on a galvanized metal bed in our Zone 6b kitchen garden after the neighbor’s maple finally got tall enough to shade the whole west row by 3 p.m. The bed was already full. Good soil, worms, half-broken-down leaf mold, the whole thing. I was not about to shovel it out just to move it twelve feet.
This is the method I’d use again.
How to move a raised garden bed without emptying it
First, a warning from someone who has bent metal beds before: this works best on smaller or mid-size beds, especially the 2x4, 3x4, 2x6, and some 3x6-ish beds. If you’ve got a 4x8 bed filled 18 inches deep with wet soil, don’t be a hero. That’s not a “slide it over” situation. That’s a shovel-and-wheelbarrow day, or a “call two neighbors and bribe them with pizza” day.
But for a typical bottomless metal raised bed? This works surprisingly well.
The trick is not strength. It’s keeping the soil from shearing apart.
Soil in a raised bed isn’t just loose dirt sitting there. After a season or two, it settles into a fairly stable slab, especially if you’ve got roots, compost, fungal threads, and a little clay in the mix. If you can cut it loose from the ground underneath and support it from below, the whole thing can move as one piece.
Not gracefully. But it moves.
Here’s the short version:
- Dry the bed slightly and clear anything tall.
- Slide cardboard under the soil block.
- Use a tarp as a sled.
- Drag the bed into place and settle it back down.
That’s it. No emptying the soil. No rebuilding the bed. No losing all the good stuff you spent years making.
Before you touch the bed, make the new spot boringly ready
Do this first. Not after the bed is halfway across the yard and your helper is standing there holding one side saying, “Where is this going again?”
Ask me how I know.
Mark the new location with stakes, bricks, or a hose. Check the sun for the actual growing season, not the pretty March version of your yard. Our mistake was assuming a bed would stay sunny because it was sunny in April. By July, it was basically growing lettuce whether we wanted lettuce or not.
Level the new spot as much as you can. A metal bed doesn’t need to be perfect, but if one corner is two inches low, you’ll see it forever. The water will run that direction. Mulch will drift. Tomatoes will lean. It’ll annoy you every time you walk past.
I usually scrape the area flat with a hoe, knock down any high spots, and set a 4-foot level across a scrap 2x4. Fancy? No. Works.
If there’s grass, scalp it low. You don’t need to remove every root if you’re moving a bottomless bed with a thick soil block, but I do like to lay down a couple layers of plain cardboard at the destination. Brown shipping boxes, tape removed. Worms love it, grass hates it, everyone wins.
If you’re still deciding whether your current bed is even worth moving, I’d pause and compare it against the sturdier options in our raised bed roundup here: best raised garden beds for 2026. Some flimsy beds are more trouble to relocate than they’re worth. Been there. Bent that.
Step 1: dry it down, but don’t turn it into dust
This part matters more than people think.
Wet soil is heavy. Ridiculously heavy. If you water the bed the morning you move it, you’ve basically made a mud brick and asked your knees to file a complaint.
But bone-dry soil won’t hold together. It crumbles, spills out under the bed walls, and turns your “soil intact” plan into a slow-motion landslide.
The sweet spot is slightly damp. Like a wrung-out sponge, not cake batter.
For us, that usually means we stop watering two or three days ahead, unless it’s blazing hot. If the bed is planted, we’ll water lightly the evening before just around the root zones, not soak the whole bed. If it’s empty, even better.
Pull out stakes, trellises, cages, drip lines, hoops, row cover clips, and anything else that will snag. I once forgot a tomato spiral stake and nearly took out a cucumber trellis in the next bed. Dumb little stuff becomes very annoying once the bed is moving.
If the bed has living plants in it, cut your expectations in half. Shallow-rooted greens and herbs usually tolerate the move. Peppers might sulk for a week. Tomatoes? I’d rather move the bed before planting them. If you have to move a planted bed, do it late in the day and water it in after. Shade cloth the next afternoon if the plants look dramatic.
And plants can be very dramatic.
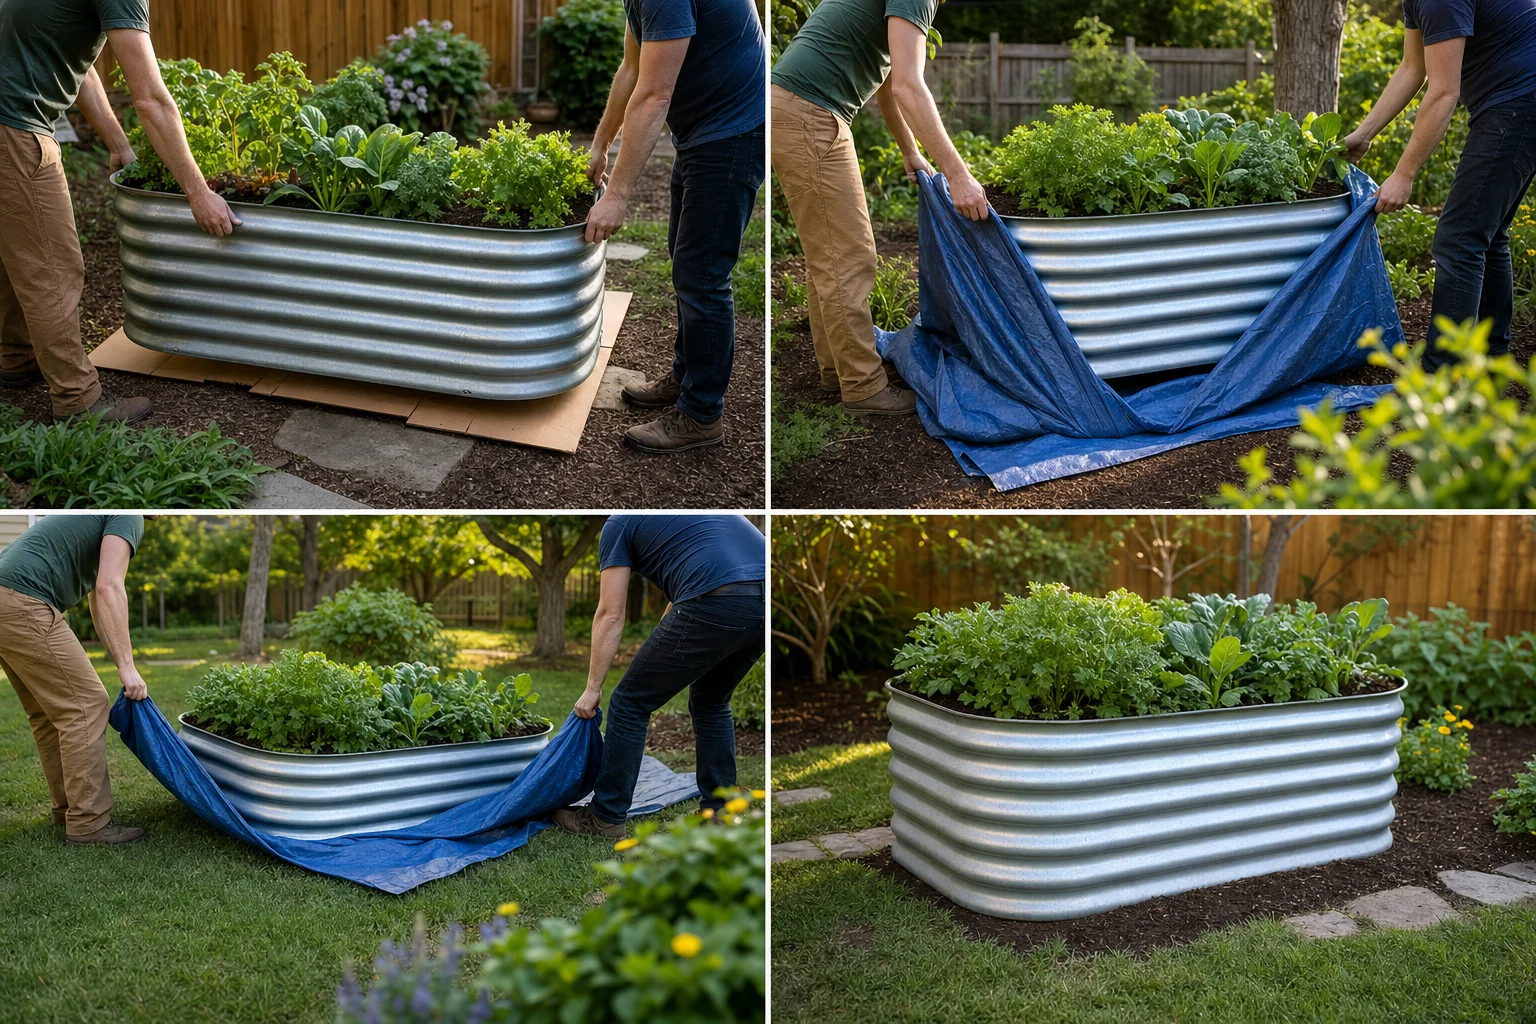
Step 2: cut the soil block loose and slide cardboard underneath
This is the step that saves the soil.
Most metal raised beds are bottomless, so the soil has worked itself into the native ground a bit. Roots have gone down. Worms have made tunnels. That’s good for gardening, bad for moving.
Take a flat spade or edging shovel and cut straight down around the inside edge of the bed. Not outside. Inside. You’re trying to separate the soil block from the wall and from the ground below, just enough that it’ll slide.
Then work around the outside and loosen the bottom edge of the metal bed from the soil and grass. Don’t pry hard against thin panels. They’ll bend. Use small movements. Annoying, yes. Better than crumpling a corner.
Now get cardboard.
Big pieces are best: appliance boxes, bike boxes, those giant chewy pet food shipping boxes, whatever you’ve got. Flatten them. Remove plastic tape if you can, mostly because tape ends up haunting the garden forever.
You want to slide cardboard under the bed and soil block like you’re making a temporary bottom.
Here’s how we do it:
- Tip one long side up just an inch or two.
- One person holds the bed steady.
- The other person shoves cardboard underneath with both hands or a flat shovel.
- Set that side down.
- Move to the opposite side and repeat.
- Overlap the cardboard sheets in the middle if you can.
Don’t lift the whole bed. Don’t try to deadlift a soil-filled rectangle. Just tip, slide, set down.
The cardboard doesn’t have to be perfect. It’s not a permanent floor. It just needs to bridge enough of the bottom so the soil doesn’t dump out when the bed starts moving.
If your bed is deeper than 12 inches, or the soil is loose and compost-heavy, use two layers. We had one bed filled with a fluffy compost mix from a local supplier — beautiful for carrots, terrible for moving. One layer of cardboard buckled. Two layers worked.
Barely. But it worked.
Step 3: get the bed onto a tarp without tearing everything apart
This is where the tarp earns its keep.
You can drag cardboard alone over smooth grass for a short distance, but cardboard catches, folds, and tears once it hits mulch, roots, or uneven ground. A tarp turns the whole thing into a sled.
For this job, I like a real tarp, not the thin blue one that comes apart if you look at it wrong. The Heavy-Duty Garden Tarp 6x8 is the size I’d look at for small and mid-size beds — see current price at that link. The advantage of a 6x8 tarp is that it gives you enough extra material to grab and pull on a 2x4 or many 3x6 beds without wrestling a massive sail across the yard. The downside is obvious: if your bed is long, like a 2x8, it may not give you enough coverage. Measure first. Don’t guess. Guessing is how you end up with six inches of bed hanging off the end and dirt dribbling into the lawn.
We’ve also used cheap tarps. They work once, maybe. If the route is smooth grass, fine. If you’re crossing gravel or old wood chips, put cardboard under the tarp too, or expect holes.
To load the bed onto the tarp, lay the tarp beside it, not under it yet. Tip the bed slightly toward the tarp and tuck the tarp edge under the cardboard. Then go to the other side and pull the tarp through. Slow and ugly is fine.
If the bed is too heavy to pull the tarp under, use a flat shovel like a shoehorn. Push the shovel under the cardboard, lift a hair, shove the tarp farther in. Repeat every foot.
This is the part where an extra pair of hands matters. One person can technically do it on a very small bed, but I wouldn’t recommend it unless you enjoy inventing new swear words.
Don’t pull from the metal rim
Metal raised beds are strong when they’re sitting still and filled evenly. They’re not always strong when you pull sideways on one corner like a stubborn mule.
Pull the tarp, not the bed.
If the tarp has corners you can gather, grab those. If you’ve got rope, you can tie the tarp corners together and pull from that. We’ve also used an old ratchet strap wrapped around the tarp bundle, but don’t crank it tight against the bed panels. You’re not strapping a fridge to a trailer. You’re just making a handle.
And go slow.
Move it six inches. Stop. Check the soil. Check the cardboard. Check the corners. Move it another foot. Stop again.
The first time we did this, I got impatient on a turn and the whole soil block shifted toward one side. Not catastrophic, but it bowed the panel enough that I had to loosen bolts and persuade it back with a rubber mallet. I would rather not repeat that particular afternoon.
Step 4: slide it into place and settle the soil
Once the bed reaches the new spot, resist the urge to yank the tarp out like a magician.
Set the bed where you want it. Check the corners. Squint at it from the path. Adjust now, because once the cardboard softens and the soil settles, you won’t want to move it again.
If it’s off by an inch, fix it. If it’s off by six inches, definitely fix it. We once left a bed slightly crooked because we were tired, and then every path measurement after that was annoying for three years. Gardens remember laziness.
To remove the tarp, tip one side up slightly and pull the tarp out from under the cardboard. Leave the cardboard. It’ll break down. If there’s plastic tape still on it, pull that now.
If the cardboard is bunched up or sticking out the sides, trim it with a utility knife. I don’t fuss too much. A little cardboard fringe disappears under mulch.
Now water the bed gently. Not a firehose blast. Use a watering can rose or shower setting on the hose. You’re helping the soil settle back into contact with the ground. If the bed was planted, this is where you apologize to the roots.
Top off low spots with compost. Usually the soil slumps a bit after moving, especially near the edges. We add a 1-inch layer of finished compost and mulch with shredded leaves if the season allows. In spring, I’ll wait a week before direct seeding carrots or beets, just because the soil can keep shifting after the move.
What can go wrong — and how to avoid the dumb stuff
The biggest problem is twisting the bed.
A filled metal bed can rack out of square when dragged, especially if one corner catches on a root or brick. If you see a panel bowing or a corner pulling weirdly, stop. Don’t drag harder. Back up, clear the snag, and pull from a more centered angle.
The second problem is soil spilling from underneath. Usually that means the cardboard didn’t overlap enough or the bed was too dry. You can patch it mid-move. Tip the bed, shove in another piece of cardboard, keep going.
The third problem is bent or damaged panels. Sometimes it’s your fault. Sometimes the bed was already thin and tired. Sometimes a bolt hole tears because the bed has been through six winters and the metal finally gives up.
If you’ve got a Vego bed and you bend a panel during a move, the Vego Garden Replacement Panel Set is worth knowing about — see current price at that link. The specific advantage is that you may be able to replace damaged panels instead of buying a whole new raised bed. The disadvantage is that it’s not a universal fix for every brand or every old off-size bed sitting in your yard. Match your bed before ordering. Bolt patterns and panel dimensions matter.
For folks starting over with better beds rather than moving mystery metal from Facebook Marketplace, we’ve put our current picks here: best raised garden beds for 2026. I’m picky about panel stiffness now because I’ve moved enough beds to know the difference between “fine in year one” and “folds like a taco when you look at it sideways.”
When I would not move a filled raised bed
I know the whole point here is how to move a raised garden bed without shoveling. Still. There are times I’d shovel.
If the bed is more than 4x8, I’d empty at least half.
If the soil is soaked, wait.
If the bed is full of mature tomato plants tied to a trellis system, I’d probably harvest what I could and move the bed after frost. Your mileage may vary, but I’ve never had good luck moving big fruiting plants and expecting them to act normal afterward.
If the panels are already rusted through, warped, or missing bolts, don’t drag it full. Repair it first or retire it.
And if the bed is sitting on aggressive perennial weeds — bindweed, quackgrass, Canada thistle — I would not move that soil intact into a clean area. Sorry. That’s how you spread the problem. In that case, I’d shovel the soil onto a tarp, pick through roots, solarize if needed, and start fresh at the new site. Slower, but less heartbreaking.
The setup I’d use if I were doing this tomorrow
For a small-to-medium metal raised bed, I’d use:
- Large flattened cardboard boxes, two layers if the soil is fluffy
- One sturdy 6x8 tarp, like the Heavy-Duty Garden Tarp 6x8
- A flat spade or edging shovel
- Gloves, because metal bed edges are rude
- One helper with decent patience
- A rubber mallet
- A socket wrench or screwdriver that fits the bed bolts
- Compost for topping off afterward
That’s the kit. Nothing fancy.
The tarp is the one thing I wouldn’t skip. Cardboard gets the soil loose. The tarp does the moving. Without it, you’re dragging a damp cardboard-bottomed soil brick across the yard, and that goes about as well as it sounds.
For bed repairs, the Vego Garden Replacement Panel Set makes the most sense if you already have a compatible Vego setup and one panel took the damage. I wouldn’t buy replacement panels hoping they’ll magically fit a random bargain bed. They might not. For a mismatched or very flimsy bed, I’d rather replace the whole thing with a sturdier model — again, our notes on that are in the raised bed guide.
If I had to pick one purchase for this job, I’d pick the tarp before anything else. You can scrounge cardboard. You can borrow a shovel. But a good tarp makes the difference between a controlled slide and a yard full of spilled soil.
A few small tricks that make the move easier
Move downhill if you can. Not wildly downhill — you don’t want a runaway bed — but even a slight slope helps.
Mow the path first. Tall grass grabs the tarp and makes everything harder.
Avoid sharp turns. Make wide, lazy turns like you’re steering a canoe, not parallel parking.
If you need to cross gravel, lay scrap cardboard or thin plywood over the gravel first. Tarps hate gravel.
If the bed has bolts, check them before moving. Loose bolts let panels flex more than they should. Tighten them, but don’t strip them.
If you’re moving over mulch, rake a path. Wood chips pile up in front of the tarp like snow in front of a shovel.
And if your helper says, “Stop,” stop. The person not pulling often sees the corner bending before the puller feels it.
We learned that one the expensive way.
Our Top Picks
Heavy-Duty Garden Tarp 6x8
Heavy-Duty Garden Tarp 6x8. A practical pick we've seen recommended for this use case — verify the current spec, size, and finish on the merchant page before you order.

Vego Garden Replacement Panel Set
Vego Garden Replacement Panel Set. A practical pick we've seen recommended for this use case — verify the current spec, size, and finish on the merchant page before you order.