How to Grow Dahlias from Tubers: Planting, Staking, and Pinching for More Blooms
When to plant, how deep, how to stake before the bed fills in, and the one mid-summer pinch that doubles bloom count.
If you’re trying to figure out how to grow dahlias from tubers, here’s the short version: don’t plant them too early, don’t bury them like potatoes, stake before you think you need to, and pinch the main stem when the plant is still young enough that it feels a little rude. That last part is where a lot of new dahlia growers chicken out. We did too. First year, I let every plant grow one big proud stalk because cutting the top off felt wrong. Pretty flowers, yes. Not many of them. The next season we pinched at 14–16 inches and the plants turned into proper bushes. More stems. More cuts. Less flopping around like drunk umbrellas after a storm.
We grow dahlias in Zone 6b, in a fenced kitchen garden that is already too full by June. They get shoved between zinnias, basil, calendula, and whatever tomato I swore I wasn’t planting this year. Dahlias are not hard, exactly. They’re just fussy about timing and support. Miss either one and you’ll spend August tying broken stems to whatever stick is closest.
How to grow dahlias from tubers without making it complicated
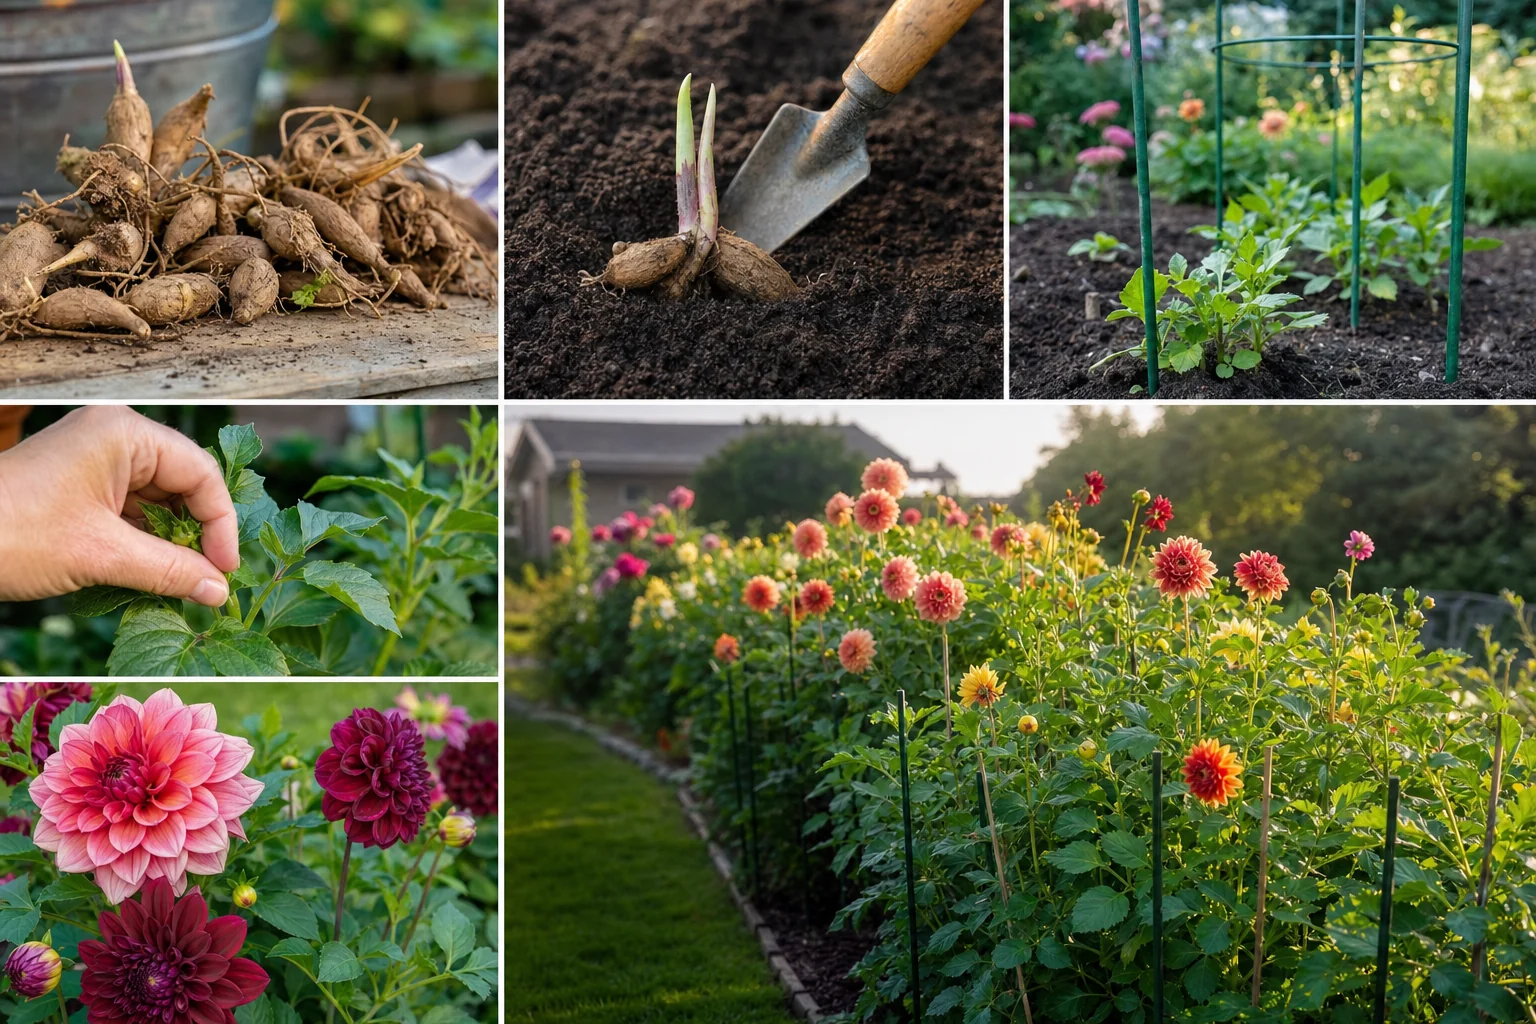
A dahlia tuber is basically a storage root with a little growing point — the eye — up near the crown. No eye, no plant. A fat tuber with no eye is just a sad sweet potato-looking thing.
When you buy tubers, look for:
- A firm tuber, not shriveled like an old carrot
- A visible crown
- At least one eye, even if it’s tiny
- No sour smell, moldy fuzz, or wet mush
- Labels that won’t disappear by July
That last one matters more than you think. We once planted six “mystery dinnerplates” from a local swap. One was gorgeous. One was orange in a way that fought every other flower in the bed. Two never sprouted. One was probably not a dahlia. Lesson learned.
For beginners, I’d rather start with a reliable mixed box than bargain-bin tubers unless you like gambling. The Longfield Gardens Premium Dahlia Tuber Box is a reasonable place to start if you want labeled tubers from a known flower supplier. Advantage: you’re not piecing together a planting from random half-dead bags at the garden center. Disadvantage: you may not get the exact color palette you’d choose one tuber at a time, and you’ll need to check the current price.
If you’re building a cut flower bed from scratch, dahlias fit beautifully into a small flower farm layout, but they do take space. I’d pair this guide with our broader cut flower planning post here: how to start a cut flower garden. Especially if you’re trying to make bouquets instead of just growing one heroic plant by the mailbox.
When to plant dahlia tubers
Do not plant dahlias with your peas. Do not plant them because you had one warm Saturday in April and got excited. Ask me how I know.
Dahlia tubers want warm soil. Not warm air. Soil.
For us in Zone 6b, that usually means mid-May, sometimes the week after Mother’s Day. If spring has been cold and wet, I wait. The tubers don’t gain anything by sitting in chilly mud. They just rot quietly underground while you walk around feeling optimistic.
A decent rule:
- Plant after your last frost date
- Wait until soil is around 60°F
- Don’t plant into soggy beds
- If you’d be uncomfortable sitting on the soil in jeans, the tubers probably aren’t thrilled either
In warmer zones, you may plant earlier. In Zone 7, many gardeners can start late April. Zone 8 and up gets trickier because heat and humidity bring their own problems, but the same warm-soil rule applies.
We’ve tried starting tubers indoors in pots. Mixed results. It works if you have strong light, enough space, and you don’t overwater. It fails spectacularly if you put them in a dim basement and fuss over them every day with a watering can.
A 1-gallon nursery pot with barely damp potting mix is enough for pre-sprouting. Don’t soak it. Don’t love it to death. Once you see growth and outdoor soil has warmed, transplant carefully.
How deep to plant dahlia tubers
Plant dahlia tubers about 4 to 6 inches deep, laid mostly horizontal, with the eye facing up if you can tell where it is.
Not vertical. Not 10 inches down. Not in a crater.
Here’s our usual method:
- Dig a hole about 6 inches deep.
- Mix in compost, but don’t dump raw manure or hot fertilizer directly on the tuber.
- Lay the tuber on its side. Crown/eye toward the top.
- Cover with 3 to 4 inches of soil at first.
- Backfill a little more as the sprout grows, if needed.
If the soil is dry-dry, I’ll water once after planting. If the bed has spring moisture, I don’t water again until I see green growth. This feels wrong. It is not wrong.
The tuber has stored energy. What it does not need is cold wet soil wrapped around it for three weeks.
Spacing depends on the variety, but for cut flowers I use 18 to 24 inches between plants. Dinnerplate types get the wider end. Smaller ball dahlias can be closer, but don’t cram them unless you enjoy powdery mildew and snapping stems. Airflow matters.
And labels. Use real labels. Pencil on plastic tags has outlasted Sharpie for us, which is annoying but true. By September, “Cafe au Lait” and “mystery peach maybe?” look very different in a bouquet plan.
Soil prep: dahlias are hungry, but they hate wet feet
Dahlias want rich soil that drains. That combination is where people get into trouble.
Our worst dahlia year came after we filled a new bed with “screened topsoil” from a contractor. It looked fine when dumped. By June it had settled into something like brownie batter with gravel. The dahlias grew, technically, but the stems were short and the tubers came out ugly in fall. Never again.
Now we prep dahlia beds with:
- Finished compost
- A little balanced organic fertilizer at planting
- Loose soil to at least 10 inches
- No standing water after rain
- Mulch once the plants are up and growing
If your soil is heavy clay, plant on a slight mound or raised bed. Dahlias can handle rich soil. They cannot handle being parked in a bathtub.
We use shredded leaves, straw, or old hay as mulch once the plants are 8–10 inches tall. Too early and the soil stays cool. Too thick around young shoots and slugs move in like they signed a lease.
Staking before the bed fills in
This is the part I’d write on your hand with a marker: stake at planting.
Not when the plant is waist-high. Not after the first thunderstorm. Not when you “get around to it.”
Dahlias are brittle. Big hollow stems, heavy flowers, lots of sail area. A loaded dahlia plant in August can look sturdy right up until a storm folds it in half.
We use two systems, depending on the bed.
Individual bamboo stakes
For small plantings or mixed beds, I like one stake per plant. A 6-foot stake is better than a 4-foot stake, because once you bury 10–12 inches and the plant grows, short stakes become decorative toothpicks.
The Bamboo Garden Stakes 6ft 25-Pack is the kind of practical dahlia support I reach for in mixed beds. Advantage: simple, cheap per plant, and easy to move around if you change the layout. Disadvantage: bamboo eventually splits or rots, and thin stakes can snap if you’re growing huge dinnerplate varieties in windy spots.
I pound the stake in at planting, 2–3 inches away from where the tuber crown sits. If you wait until later, you risk spearing the tuber clump. Been there. Felt terrible.
Tie the main stem loosely as it grows. I use jute twine or soft plant ties. Not wire. Wire cuts into stems once the plant starts swaying.
Netting for rows
For a dedicated dahlia row, netting is cleaner. You stretch the net horizontally over the bed, usually 12–18 inches above the soil for the first layer, then sometimes another layer higher if the plants get tall.
Hortonova Trellis Netting for Dahlia Support is the standard style flower growers talk about. Advantage: it supports the whole row, and stems grow up through the grid instead of needing individual tying every week. Disadvantage: it’s a pain when you’re cutting, weeding, or digging tubers in fall, and if you don’t pull it tight it becomes a floppy green hammock.
For our 3-foot-wide beds, we run T-posts or sturdy stakes at the corners, pull the net tight, and clip it in place. If the bed is only eight or ten plants, I don’t bother. If it’s a full row, netting wins.
This is also where planning your cut flower garden helps. Dahlias should not be tucked behind taller chaos unless you like crawling through foliage with pruners in your teeth. The spacing ideas in our cut flower garden starter guide will save you some grief.
The pinch that gets you more blooms
Pinching dahlias is simple, but it feels brutal the first time.
When the plant is about 12 to 18 inches tall and has 3 or 4 sets of true leaves, cut or pinch out the growing tip above a leaf node. That’s it. You remove the top few inches of the main stem.
The plant responds by pushing side shoots. Those side shoots become flowering stems.
We usually hit this point in late June, sometimes early July for later plantings. So yes, for us it can feel like a mid-summer pinch, especially in a slow spring. If your dahlias are already setting buds on one tall stem, you waited a bit long, but I’d still pinch most cut-flower varieties unless the season is nearly over.
What happens if you don’t pinch?
You’ll still get flowers. But the plant tends to make fewer, taller, heavier stems. Fine for enjoying in the garden. Less fine if you want buckets of cuts.
Use clean snips. Or your fingers, if the stem is soft. I usually cut because I’m already carrying Felcos around like a personality trait.
One warning: don’t pinch tiny stressed plants. If a dahlia is only 8 inches tall after six weeks, yellowing, and clearly miserable, fix the growing conditions first. Pinching is for plants that are actively growing.
Watering dahlias without rotting them
Dahlias need steady water once they’re growing. Before they sprout, they need almost none.
That difference matters.
After the plants are up, we aim for deep watering 1–2 times a week depending on rain, heat, and mulch. In July heat, sandy beds may need more. Heavy clay may need less. Stick a finger into the soil. Fancy moisture meters are fine, but your finger is free and harder to misplace.
Avoid overhead watering if you can. Wet foliage plus crowded plants equals mildew season.
Drip irrigation is ideal. We run 1/2-inch mainline with 1/4-inch drip to some beds and soaker hose in others. Neither setup is glamorous. Both beat standing outside at 8 p.m. pretending I’m “just giving them a quick drink” for 45 minutes.
What about growing dahlias in containers?
You can grow dahlias in containers, but don’t put a full-size dinnerplate dahlia in a cute 10-inch patio pot and expect miracles. Use a big container — at least 5 gallons for compact types, larger for tall varieties. Bigger is better.
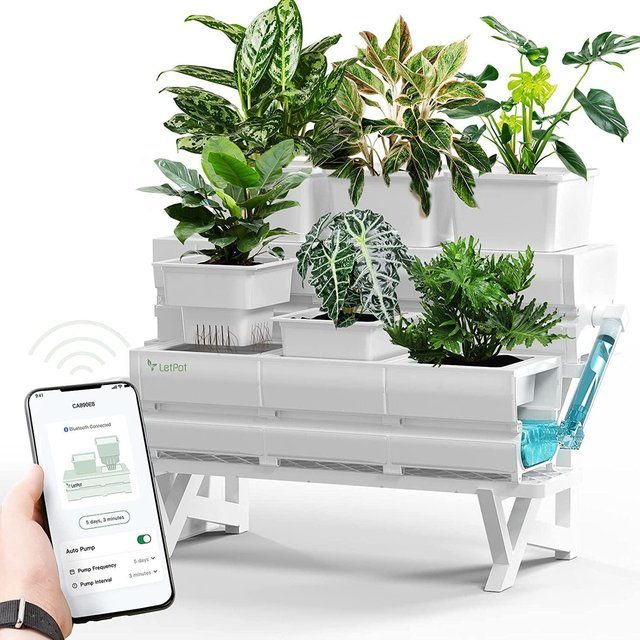
For patios, rentals, or small controlled setups, the Smart Modular Planter with App Control and Automatic Water Cycling (MP1) is more interesting than a standard pot because the product is built around app control and automatic water cycling. Advantage: consistent watering help, which is useful if you’re away for weekends or trying to keep container plants from swinging between bone-dry and swamp. Disadvantage: dahlias still need enough root space, sun, and physical support, so I wouldn’t treat a smart planter as a magic fix for tall cut-flower varieties.
If you’re using that planter somewhere without a convenient outlet, the matching Solar System with Panel and Battery(Suitable for MP1) makes sense for off-grid power. Advantage: it pairs with the MP1 and keeps the setup less dependent on extension cords. Disadvantage: shade, cloudy weather, and placement will matter. A solar panel tucked under the porch roof is mostly yard sculpture.
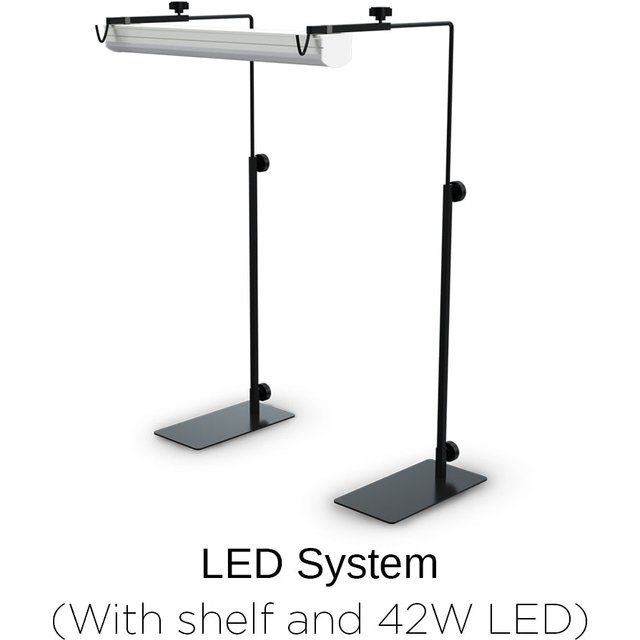
The LED Growing Light system (Suitable for MP1) is more useful for pre-sprouting tubers, cuttings, or growing compact plants where natural light is weak. Advantage: controlled light when spring is gray and windowsills are useless. Disadvantage: outdoor dahlias in full sun do not need an LED system, so don’t buy lights for plants that are going straight into a sunny bed.
If I had to pick one support and growing setup for most people? Put dahlias in the ground or a deep raised bed, use 6-foot bamboo stakes for small plantings, and use netting for rows. That’s the boring answer because it works.
Feeding dahlias: enough, not ridiculous
Dahlias are heavy feeders, but overfeeding with nitrogen gives you lush green shrubs and not enough flowers. We made that mistake with fish emulsion one year. The plants looked like they were training for a bodybuilding competition. Blooms came late.
At planting, I mix compost into the bed and use a balanced organic fertilizer according to the label. Once plants are growing, I may feed lightly every few weeks, especially if the bed is producing hard. By mid-season, I lean toward lower nitrogen and more bloom-friendly feeding, but I don’t get too precious about exact numbers.
If your plants are dark green, tall, and not flowering, back off nitrogen.
If leaves are pale and growth is weak, check water first, then fertility.
If buds form but stems are short, it may be heat, variety, crowding, or inconsistent moisture. Dahlias like to keep us humble.
Cutting flowers so the plant keeps producing
Cut dahlias often. This is not stealing from the plant. This is the job.
The more you cut, the more the plant pushes new flowering stems, assuming it has water and fertility. If you leave old blooms on the plant, it starts shifting energy toward seed production. You don’t want that unless you’re breeding dahlias, which is a whole separate rabbit hole.
Cut when the flower is mostly open but not old. Dahlias do not open much after cutting, unlike some flowers. A tight dahlia bud in a vase usually stays a tight dahlia bud and then sulks.
Best cutting time is morning or evening. Use clean snips and cut deep into the plant, down to a strong leaf node. Long cuts encourage longer future stems. Short little cuts leave awkward branching and stubby stems.
Strip lower leaves before putting stems in water. Dahlia foliage gets funky in a vase fast. We use clean buckets with cool water and let stems rest in the shade before arranging.
Some varieties last longer than others. Ball dahlias tend to hold better for us than huge dinnerplates. Dinnerplates are spectacular for about five minutes and then begin their dramatic decline. Still worth it sometimes.
Deadheading, pests, and the stuff nobody puts on the tuber label
Deadhead anything you don’t cut. A spent dahlia bloom has a cone-shaped back; a new bud is rounder and firmer. Once you learn the difference, you’ll stop accidentally cutting off future flowers. Mostly.
Pests we see:
- Slugs on young shoots
- Earwigs in petals
- Aphids on tender growth
- Japanese beetles some years
- Spider mites in hot dry spells
2024 was the year aphids destroyed our zucchini, but the dahlias mostly dodged it. No idea why. The calendula nearby was crawling with ladybug larvae, so maybe that helped. Take that with a grain of salt.
For slugs, I use iron phosphate bait when pressure is bad, plus hand-picking if I’m feeling virtuous. Earwigs are annoying but not usually plant-ending. Aphids can often be blasted off with water or handled by beneficial insects if you don’t panic-spray everything.
Powdery mildew shows up when airflow is poor or nights get damp. Space plants properly, water at the base, and remove the worst leaves. By late September, I don’t fight every ugly leaf. The season is what it is.
Digging and storing tubers
If you live where the ground freezes, you’ll need to dig dahlia tubers after frost. Wait until frost blackens the top growth, then give the plant several days if weather allows. The tubers toughen up a bit.
Cut stems down to 4–6 inches. Dig wide. Wider than you think. The tuber clump may be bigger than the plant looked above ground.
Lift gently with a garden fork. Do not yank by the stem unless you enjoy snapping necks off tubers.
We rinse some clumps and leave others with soil on, depending on weather and how much energy we have. Then they cure somewhere protected and not freezing. After that, store in slightly damp peat, vermiculite, wood shavings, or another medium that keeps them from shriveling without turning them into soup.
Storage is the part I’m still tinkering with. Our basement runs dry in winter. One year I stored tubers too dry and lost half. Another year I packed them too damp and grew mold like it was a side crop. Now I check them monthly. Annoying, but cheaper than replacing everything.
Label before storage. Label again after dividing. Future you is not as good at identifying dormant tubers as current you thinks.
My basic dahlia plan for a first-year grower
If you’re new and want a simple plan, I’d do this:
Buy 6 to 10 tubers from a decent source. Plant them in one sunny bed with compost and good drainage. Space them 18–24 inches apart. Put in 6-foot bamboo stakes the same day you plant. Don’t water much until sprouts emerge. Pinch at 12–18 inches. Mulch after the soil warms. Cut flowers hard and often.
Skip the rare $38 tuber your first year. Skip the 40-variety spreadsheet unless spreadsheets bring you joy. Grow a handful well.
If you want a full bouquet garden around them, build the whole thing around bloom windows, spacing, and access paths. Dahlias are wonderful, but they’re not the only crop. Zinnias, cosmos, basil, celosia, and sunflowers carry a lot of weight while dahlias get going. This is exactly why we put together the broader guide on starting a cut flower garden. Dahlias make more sense when the rest of the bed is planned, not crammed in wherever there’s dirt showing.
And if you only remember one thing: stake early, pinch once, cut often. That will get you most of the way there.
Our Top Picks
Smart Modular Planter with App Control and Automatic Water Cycling (MP1)

Solar System with Panel and Battery(Suitable for MP1)