Seedling Heat Mats With Thermostats: Winter & Early Spring Guide
How to choose and set up UL-listed seedling heat mats with digital soil-probe thermostats for indoor seed starting and cold-room germination.
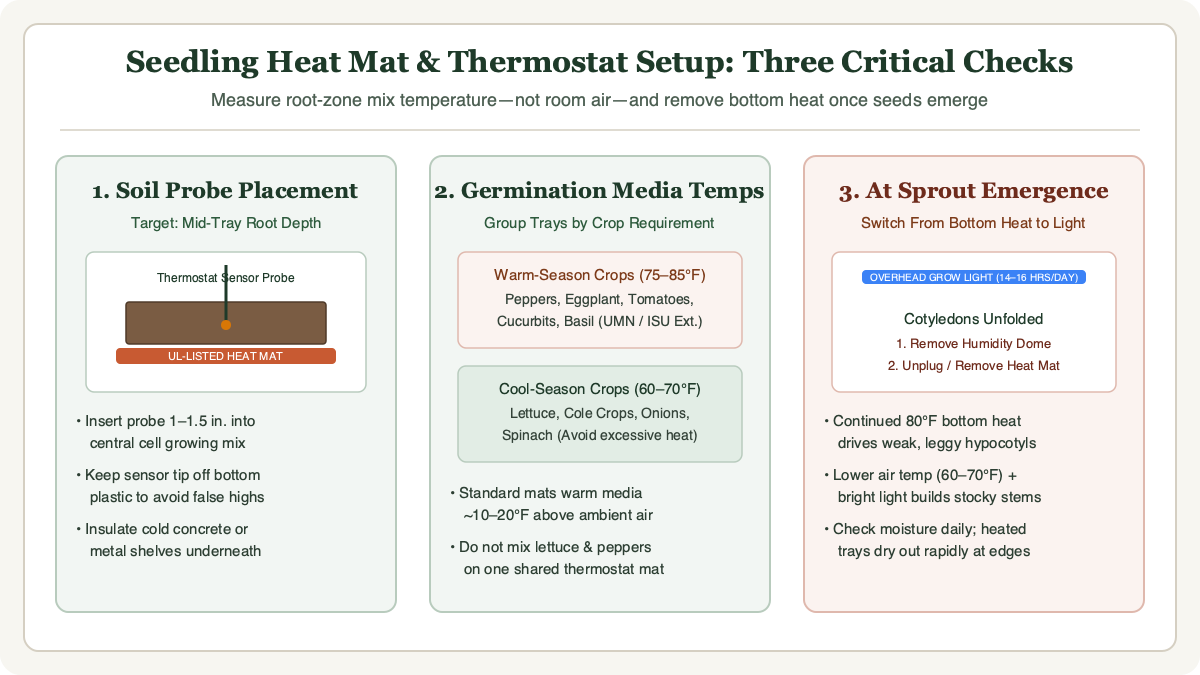
A seedling heat mat with thermostat controls root-zone growing medium temperature directly rather than relying on room air or a fixed wattage output. To use one safely and effectively this week, choose a waterproof horticultural propagation mat carrying an independent electrical safety listing (such as UL or MET), insert the thermostat’s wired sensor probe midway into a representative cell of moist seed-starting mix, set the target temperature to match the specific crop’s germination range (typically 75–85°F for warm-season vegetables like peppers and tomatoes, or 60–70°F for cool-season crops), and remove the tray from bottom heat as soon as seedlings emerge and place them under overhead grow lights.
Why Root-Zone Media Temperature Matters More Than Room Air
Indoor gardeners often evaluate a seed-starting area by looking at the wall thermostat in the room. However, seeds do not germinate in room air; they germinate inside damp, evaporative growing media. Because water evaporating from the surface of a flat draws thermal energy out of the mix—a process known as evaporative cooling—moist potting mix in an unheated tray frequently sits several degrees cooler than the surrounding room temperature. In a basement, spare room, or garage shelf where ambient air hovers between 55°F and 64°F, unheated seed-starting mix can remain chilly enough to stall warm-season seeds for weeks or invite seed rot before the radicle ever emerges.
According to University of Minnesota Extension, most annual vegetable and flower seeds germinate best when the soil medium is held between 65°F and 75°F, with warm-season crops such as tomatoes, peppers, and eggplants germinating much more rapidly and uniformly when the medium is warmed toward 75°F to 80°F. Similarly, University of Maryland Extension notes that while many vegetable seeds can eventually sprout at 60°F to 65°F, warm-season crops benefit substantially from bottom heat that holds the growing medium around 70°F to 80°F, cutting days-to-emergence and producing an even stand across the flat.
When you use an unregulated propagation mat without a thermostat controller, the resistance heating element runs continuously whenever it is plugged in. Manufacturers typically design standard 17-watt to 20-watt single-flat mats to raise root-zone temperatures roughly 10°F to 20°F above ambient room air. That fixed boost is an approximation, not a controlled setpoint. If a cold basement stays at 55°F through the night, an unregulated mat may struggle to reach 72°F without insulation underneath. Conversely, if a sunny window or furnace cycle warms the room to 74°F during the afternoon—or if a clear plastic humidity dome traps warm air over the tray—an unregulated mat can push the growing mix past 90°F, overheating sensitive seeds and drying out shallow cells within hours.
Adding a dedicated digital thermostat controller with a submersible soil-temperature probe solves both problems. Instead of guessing how room fluctuations, shelf materials, or humidity domes are affecting the root zone, the controller reads the actual temperature inside the damp growing medium and switches power to the mat on and off to hold the target range.
Crop-Specific Germination Temperatures: What to Group and What to Separate
One of the most common mistakes in winter and early spring seed starting is placing every seed packet sown that weekend onto a single large heat mat set to 80°F. Different vegetable and herb families evolved to germinate in very different soil seasons. As Iowa State University Extension documents in its germination requirement tables for annuals and vegetables, optimal media temperatures and days to emergence vary sharply by species, and excessive heat can actively inhibit certain cool-season crops such as lettuce or spinach (a condition known as thermodormancy).
Before plugging in a heat mat, sort your seed packets into temperature-compatible batches so every cell on a given tray shares a similar target setpoint.
| Crop Category & Examples | Typical Minimum Media Temp | Optimal Germination Media Temp | Typical Emergence Window at Optimum | Heat Mat Strategy |
|---|---|---|---|---|
| Warm-Season Solanums (Peppers, Eggplants) | 60°F (slow, erratic) | 75°F – 85°F | 6 – 12 days | High-priority candidates for thermostat-controlled bottom heat at ~80°F until cotyledons break the surface. |
| Tomatoes & Tomatillos | 50°F – 55°F | 70°F – 80°F | 5 – 8 days | Germinate reliably at 75°F; remove promptly upon emergence to prevent tall, spindly hypocotyl stems. |
| Warm-Season Vine Crops & Basil (Cucumbers, Melons, Squash, Sweet Basil) | 60°F | 75°F – 85°F | 3 – 7 days | Fast germinators in warm media; start later in spring and move under bright light immediately at hook stage. |
| Cool-Season Brassicas & Alliums (Broccoli, Cabbage, Kale, Brussels Sprouts, Onions, Leeks) | 40°F – 45°F | 65°F – 75°F | 4 – 10 days | Do not require a heat mat in a 68°F living space; use a thermostat set to 68°F–70°F only in cold (50°F–58°F) basements. |
| Heat-Sensitive Cool Greens (Lettuce, Spinach, Parsley, Celery) | 35°F – 40°F | 60°F – 68°F | 5 – 14 days | Keep off warm 80°F pepper mats; temperatures above 75°F–80°F can induce dormancy in lettuce and spinach seed. |
Reference: Adapted from germination guidance published by Iowa State University Extension, University of Minnesota Extension, and University of Maryland Extension. Always verify cultivar-specific instructions printed on the seed packet.
Why You Should Not Sow Mixed Warm and Cool Crops in One Flat
If you sow half of a 72-cell plug tray with hot peppers (needing 80°F for 8 to 12 days) and the other half with broccoli or lettuce (emerging in 4 to 6 days at 65°F to 70°F), you create an unavoidable management conflict. By day five, the brassicas or greens have sprouted and must come off the heat mat and out from under the humidity dome so they do not stretch into weak, leggy stems. Meanwhile, the slow-germinating pepper seeds in the adjacent cells still need another week of warm, covered moisture.
Instead of sowing mixed species into one continuous 1020 cell insert, use separate half-trays, individual 6-cell or 12-cell removable packs, or small nursery pots. That modular layout allows you to lift each crop out of the warm germination zone on the exact day its seedlings emerge while leaving slower varieties on the thermostat-controlled mat. For broader planning on how trays, cell sizes, and domes fit together, see our cluster pillar guide on choosing seed-starting kits and trays for spring homesteading.
How to Evaluate a Seedling Heat Mat With Thermostat Before Buying
When you browse Amazon search listings for seedling heat mats with digital thermostats, you will see dozens of visually similar black vinyl mats bundled with plug-in controllers. Because this equipment operates around water, damp peat or coir media, and metal shelving for weeks at a time, evaluate four physical and electrical specifications rather than shopping by marketing adjectives.
1. Independent Electrical Safety Certification (UL or MET Listing)
Never use an indoor household heating pad—the cloth-covered kind sold in pharmacies for muscle aches—under plant trays. University of Minnesota Extension and University of Maryland Extension explicitly caution gardeners to use only waterproof horticultural heating mats designed for seed propagation. Household heating pads are not sealed against water intrusion, can create dangerous electrical shock or fire hazards if dampened, and run far too hot for root zones.
When inspecting horticultural heat mats and thermostat controllers, check the product specification table and the printed label on the mat corner for a recognized testing laboratory mark—commonly UL Listed (Underwriters Laboratories) or MET Listed (MET Laboratories, testing to UL 499 / CSA standards for electric heating appliances). Confirm that both the heating mat and the external digital thermostat relay carry appropriate electrical ratings for damp indoor horticulture.
2. Mat Footprint vs. Standard 1020 Tray Dimensions
A standard North American propagation flat (“1020 tray”) measures roughly 10.5 inches wide by 20.5 inches long at the base, flaring slightly at the top rim. Horticultural heat mats are commonly sold in three footprint sizes:
- Single-tray mat (~10” × 20.75”, ~17–20 Watts): Sized to fit beneath one standard 1020 flat. Ideal when you start one crop group at a time or want independent temperature control for a single tray of peppers.
- Two-tray mat (~20” × 20.75”, ~40–45 Watts): Holds two 1020 trays side by side on a deep table or wide rack. Check your wire shelving depth before ordering; standard 18-inch-deep utility shelves are narrower than a 20-inch square mat.
- Four-tray / shelf-length mat (~48” × 20.75”, ~100–105 Watts): Covers an entire 4-foot wire rack shelf, holding four 1020 flats end-to-end. Remember that a single thermostat controller plugged into a 48-inch mat can only read one probe location and switch the entire 4-foot mat as a single zone.
3. Thermostat Controller Load Rating, Probe Cord, and Display
A standalone digital seed-starting thermostat consists of three parts: a wall-plug power housing with a grounded 3-prong receptacle (where the heat mat plugs in), a digital control faceplate showing the target setpoint and current temperature, and a wired thermistor sensor probe on a flexible cord.
Check these specific controller details before ordering:
- Maximum wattage and amperage rating: Most horticultural thermostat controllers are rated for 1000W (around 8.3 Amps at 120V). That easily handles one or several 20-watt to 100-watt heat mats connected via a heavy-duty grounded splitter, provided the total draw stays well below the controller’s rated wattage and every mat on that circuit shares the exact same temperature requirement and ambient room conditions.
- Temperature control range and unit display: Verify that the controller regulates across the full horticultural range (typically 40°F–108°F or 50°F–100°F) and displays readings clearly in degrees Fahrenheit (°F) so you do not have to mentally convert Celsius while checking trays.
- Sensor probe cord length and waterproofing: Look for a sealed, corrosion-resistant stainless steel or molded plastic probe tip with a cord at least 5 to 6 feet long. A short cord forces you to mount the electrical controller dangerously close to wet trays instead of high on a dry wall or rack post above the splash zone.
4. Built-In Inline Controllers vs. Separate Thermostat Units
Some low-cost mats integrate a tiny push-button controller directly into the mat’s power cord with a permanently attached short probe, while modular kits pair a standard 3-prong heat mat with a separate plug-in thermostat box. Separate thermostat units are generally easier to service and repurpose: if a mat wears out after several seasons, you keep the thermostat; if you want to run two identical single-tray mats side by side on the same shelf for tomatoes, both mats can plug into one separate thermostat controller.
Step-by-Step Setup: Probe Placement, Shelf Insulation, and Moisture Checks
Owning a thermostat-controlled heat mat only improves germination if the sensor probe actually measures the temperature experienced by the seeds. Follow this five-step installation workflow to prevent false readings and baked edges.
Step 1: Insulate Cold Basement Concrete or Metal Shelves
Heat radiates in all directions. If you lay a thin vinyl heat mat directly onto an uninsulated concrete basement floor, a stone countertop, or a cold garage workbench, the slab acts as a massive heat sink, pulling thermal energy downward faster than the 20-watt element can warm the tray above. Even on open wire shelving, cold basement drafts circulating beneath the wire grid can chill the underside of the mat.
Place a thin insulating layer—such as a piece of corrugated cardboard, a cork board, or a thin rigid foam insulation board rated for indoor use—on the cold surface first, then lay the heat mat flat on top of that barrier. Never fold, crease, overlap, or sandwich a heat mat between two solid layers without a damp plant tray on top to dissipate the heat, and always follow the manufacturer’s clearance instructions.
Step 2: Pre-Moisten Seed-Starting Mix Before Filling Trays
Dry peat moss and coconut coir shed water and conduct heat poorly. Before sowing, mix warm water into your sterile, fine-textured seed-starting medium in a clean tub until it feels like a wrung-out sponge—uniformly damp throughout, but not dripping excess water when squeezed. Fill your clean cell inserts or shallow flats, firming the mix gently so no large air pockets remain at the bottom of the cells. Air gaps insulate the upper soil from the heat mat below and cause erratic dry spots.
Step 3: Position the Thermostat Probe in a Central Cell at Root Depth
How you place the thermostat probe determines what the controller actually does:
- Choose a central cell or pot near the middle of the heat mat, away from drafty outer edges.
- Insert the probe tip 1 to 1.5 inches deep into the moist growing mix—either angled slightly so it stays secure or routed through a small slot in the humidity dome.
- Do not push the probe tip all the way down against the bottom plastic of the tray. The thin plastic floor sitting directly against the heating element is the hottest spot in the system. If the sensor touches the bottom plastic, it will read 80°F while the seed layer an inch higher is still only 66°F, causing the thermostat to shut off prematurely.
- Do not leave the probe hanging in the air under the dome or lying on dry soil. If the probe slips out of the tray onto the floor, it will read cold room air (e.g., 58°F) continuously and lock the heat mat on continuously without cycling off, cooking the tray. Secure the probe wire to the tray rim or rack upright with a clip or twist tie so accidental bumps cannot pull the sensor out of the cell.
Step 4: Manage Humidity Domes and Daily Condensation
During the pre-emergence germination phase, covering the flat with a clear plastic dome or loose plastic wrap helps hold moisture around the top quarter-inch of seed-starting mix while bottom heat rises from below. However, bottom heat accelerates evaporation. Check trays at least once or twice daily:
- If heavy water droplets obscure the inside of the dome and the soil surface looks waterlogged, crack the dome vents or prop one corner open slightly to let excess heat and humidity escape.
- Check the perimeter cells along the outside edges of the 1020 tray. Edge cells dry out faster than center cells on a heat mat; mist them gently with room-temperature water or bottom-water briefly in a solid catch tray so the seed coat never dries out mid-germination.
Step 5: Verify With an Independent Soil or Instant-Read Thermometer
Thermistor probes can drift slightly over time or sit in a cell that is wetter or drier than its neighbors. During the first 24 hours of a new setup, spot-check two or three other cells across the tray using a clean digital kitchen thermometer or soil thermometer pushed to seed depth. If the thermostat display reads 78°F in the center cell while corner cells read 71°F, rotating the tray 180 degrees once a day evens out cumulative heat exposure.
The Critical Post-Emergence Transition: When to Turn Off the Heat Mat
The single biggest pitfall with seedling heat mats happens after the seeds sprout. A heat mat is a germination tool, not a seedling growth tool.
Both University of Minnesota Extension and University of Maryland Extension emphasize that as soon as seedlings emerge from the growing medium, two things must change immediately:
- Remove the humidity dome so air can circulate freely around the stems and foliage, reducing the risk of damping-off fungi.
- Remove the tray from the heat mat (or unplug the thermostat) and move the seedlings to a cooler, brightly lit location.
Why does continued bottom heat ruin emerged seedlings? Once a seedling unfolds its cotyledons (seed leaves), stem elongation is driven by the balance between temperature and light intensity. Warm soil and warm air around 78°F–82°F accelerate cellular respiration and tell the seedling to grow rapidly upward. Indoors, even a good LED or fluorescent shop light is much dimmer than full outdoor sunlight. When you combine high root-zone heat with indoor light levels, the hypocotyl (the stem below the seed leaves) stretches rapidly, producing pale, weak, top-heavy seedlings that flop over at transplanting.
As Iowa State University Extension and University of Vermont Extension explain, emerged vegetable and annual seedlings grow much stockier, sturdier stems when air temperatures are lowered to roughly 60°F to 70°F during the day (and 55°F to 60°F at night) while receiving 14 to 16 hours of bright overhead grow light daily.
In practice, aim to pull a tray off the heat mat when roughly half to two-thirds of the cells show emerging hypocotyl arches or unfolded cotyledons. Waiting until the last few slow seeds sprout on an 80°F mat will cause the earliest-emerging majority of seedlings to stretch irreversibly. (This is another reason sowing single varieties in removable 6-packs is so effective: you can move emerged packs to the grow-light shelf while leaving ungerminated packs on the warm mat for another two days.)
Electrical Safety and Troubleshooting Checklist
Use this quick diagnostic table whenever a heated tray behaves unexpectedly during winter propagation.
| Observed Issue | Likely Cause | Action to Take |
|---|---|---|
| Thermostat reads 60°F continuously, mat feels very hot, soil is drying out | Sensor probe pulled out of the soil cell or is measuring cold room air outside the tray. | Re-insert the probe 1–1.5 in. deep into a moist central cell and clip the cord to the tray rim so it cannot slip out. |
| Thermostat reaches target temp quickly, but seeds take weeks to sprout | Probe tip is pushed all the way against the bottom plastic directly over the heating wire. | Raise the probe tip to actual seed depth (top 0.5–1 in. of media) and check multiple cells with a separate thermometer. |
| Mat runs constantly in a 55°F basement but soil never exceeds 67°F | Cold concrete floor or uninsulated metal shelf is pulling heat downward; dome may be off. | Place rigid foam or cardboard insulation beneath the mat and use a clear germination dome until emergence. |
| Seedlings emerge quickly but immediately stretch into tall, thin, pale stems | Trays were left on the warm heat mat under a humidity dome after sprouting, or lights are too high/dim. | Unplug or remove the heat mat at emergence, remove the dome, lower room temp to 60°F–70°F, and provide 14–16 hours of overhead light. |
| Outer ring of cells dries into hard bricks while center cells stay moist | Normal edge evaporation amplified by bottom heat and room drafts. | Check moisture daily, mist or bottom-water dry edge cells gently, and avoid mats larger than the tray footprint. |
For storage after spring transplanting, wipe the unplugged vinyl mat clean with a damp cloth and mild soap, let it dry completely, and roll it loosely in a large cylinder—never fold it sharply across the internal heating wires, which can fatigue the resistance element over time.
Frequently Asked Questions
Do I need a thermostat for a seedling heat mat, or can I plug it directly into the wall?
You should use a digital thermostat controller with a soil probe whenever you start seeds in rooms where temperatures fluctuate, in cold basements, or under humidity domes. An unregulated heat mat applies constant wattage and typically warms soil 10°F to 20°F above ambient air, which can easily overheat seeds past 90°F on a warm afternoon or fail to reach optimal pepper germination temperatures in a chilly room.
Where exactly should the seedling heat mat thermostat probe be placed?
Insert the temperature sensor probe about 1 to 1.5 inches deep into the damp seed-starting mix of a cell near the center of the tray. Make sure the metal or plastic tip is surrounded by moist growing medium at root depth rather than touching the hot plastic bottom of the flat or hanging in open air, and secure the cord so it cannot accidentally pull out.
Should I leave the seedling heat mat on 24 hours a day during germination?
Yes, during the pre-emergence germination phase, leave the heat mat plugged into its thermostat controller 24 hours a day so the controller can cycle power on and off to maintain a steady root-zone temperature day and night. As soon as seedlings emerge from the soil, however, turn off or remove the heat mat completely and provide 14 to 16 hours of overhead light per day.
Can I put multiple seed trays on one thermostat controller?
You can plug two or more identical-wattage heat mats into one digital thermostat controller (using a heavy-duty grounded splitter within the controller’s wattage rating, typically 1000W) only if all trays sit on the same shelf in the same ambient temperature, contain the same moisture level, and hold crops that require the exact same germination temperature. Never mix cool-season lettuce and warm-season peppers on a shared thermostat zone.
Why are my seedlings leggy even though they sprouted fast on a heat mat?
Leggy, stretched stems happen when trays remain on bottom heat after germination or lack immediate overhead light. Warm soil around 75°F to 85°F speeds up sprouting, but once cotyledons unfold, continued bottom heat drives rapid stem elongation. Remove both the humidity dome and the heat mat as soon as seeds sprout, keep air temperatures cooler (around 60°F to 70°F), and place seedlings directly under grow lights.
Products in this guide
Seedling Heat Mat With Digital Thermostat
Amazon search for seedling heat mats with digital thermostats. Compare UL/MET electrical listing, mat dimensions, and soil probe cord length before ordering.
Find matching listings on Amazon →Search results may include other models. Check the model and size before buying.