Indoor Microgreens Setup: Trays, Lights & Safe Watering
How to grow microgreens indoors using shallow drainage trays, bottom watering, and LED shelf lights from sowing to cotyledon harvest.
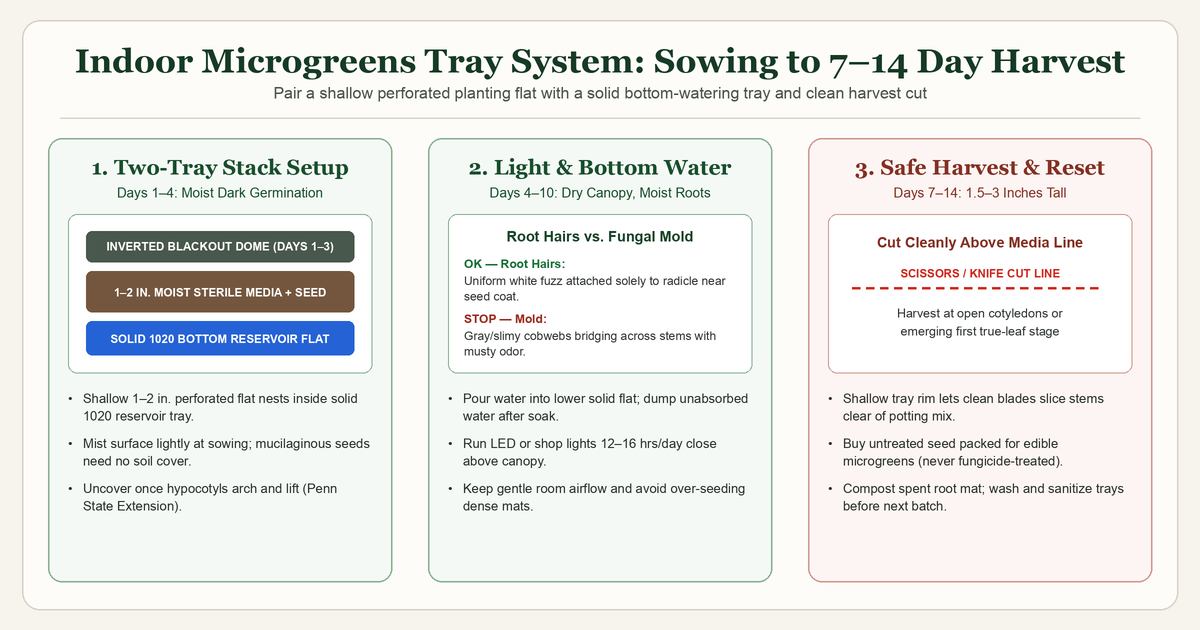
Growing microgreens indoors requires a shallow perforated planting tray (1 to 2 inches deep) nested inside a solid bottom-watering flat, a thin layer of sterile fine seed-starting mix or a clean hydroponic fiber mat, untreated seed labeled for edible microgreens, and 12 to 16 hours of overhead LED or fluorescent light once seeds germinate. Sow seeds evenly across pre-moistened medium, cover the tray for 2 to 4 days until hypocotyl stems lift, switch to bottom watering so stems and leaves stay dry, and harvest cleanly with scissors just above the soil line at 7 to 14 days when cotyledons expand or the first true leaves appear.
Microgreens vs. Sprouts vs. Baby Greens: Why the Growing Method Differs
Before setting up trays in your kitchen or basement, it is critical to distinguish microgreens from sprouts and baby salad greens. While all three are young edible stages of vegetables and herbs, university extension food-safety and horticulture specialists emphasize that they are grown, watered, and harvested under very different conditions.
According to Penn State Extension and South Dakota State University Extension, the three categories break down as follows:
| Stage & Crop Type | Growing Environment & Medium | Light & Airflow Needed | Typical Days to Harvest | What Part You Eat |
|---|---|---|---|---|
| Sprouts (Alfalfa, mung bean, broccoli jar sprouts) | Enclosed glass jar or soaking drum in high humidity; no growing medium (water rinse only) | Grown in dark or low indirect light; minimal airflow inside jar | 2 – 5 days | Entire germinated seed: root radicle, seed coat, and shoot |
| Microgreens (Radish, broccoli, kale, mustard, pea shoots, sunflower, kohlrabi) | Open, shallow flat filled with 1–2 inches of sterile potting/seed mix or a single-use hydroponic mat | 12–16 hrs/day bright overhead grow light or sunny window + open room airflow after emergence | 7 – 14 days (up to 21 days for slow herbs/beets) | Stem (hypocotyl) and cotyledon leaves only—cut cleanly above the medium; roots and seed hulls in soil are discarded |
| Baby Greens (Cut-and-come-again lettuce, spinach, arugula) | Deeper containers (3–6 inches of potting mix) or hydroponic channels with wider plant spacing | Full indoor grow-light rack or outdoor garden bed; requires plant nutrients | 21 – 40 days | Young true leaves harvested above the growing crown |
Reference: Adapted from horticultural definitions published by Penn State Extension, University of Illinois Extension, and South Dakota State University Extension.
Because sprouts are soaked and rinsed in warm, dark, enclosed containers and consumed whole—roots and all—they carry a much higher risk of bacterial contamination if seed or water hygiene slips. Microgreens, by contrast, grow anchored in a medium in open air under light, are watered from below once emerged, and are harvested with clean blades above the root zone so no potting mix or root mass enters your salad bowl.
Choosing the Right Trays, Growing Medium, and Seeds
You do not need an expensive proprietary appliance to raise winter greens indoors. As Purdue Extension and University of Illinois Extension note, clean shallow plastic containers—even perforated takeout trays or pie tins with drainage holes—can grow a test batch. However, if you want a clean, repeatable winter harvest without soggy soil or awkward scissor angles, a purpose-built two-tray shallow nesting setup makes bottom watering and harvesting much easier.
1. Why Shallow Two-Tray Systems Outperform Deep Cell Packs
Standard 6-cell or 72-cell plug inserts (used for spring tomato and pepper transplants) are too narrow and deep for microgreens. Microgreens only grow for 7 to 14 days and develop shallow, fibrous root systems that need just 1 to 2 inches of growing medium (Penn State Extension). If you sow microgreens at the bottom of a 3-inch-deep tub, the high plastic sidewalls block horizontal airflow across the stems—trapping damp air that encourages fungal damping-off—and force you to angle your scissors downward into the dirt at harvest time.
Instead, look for a matched pair of shallow flats (either full 1020 size, roughly 10” × 20”, or half-flat 1010 size, roughly 10” × 10”):
- Top planting tray (with drainage slots or mesh bottom): A rigid, shallow flat (1.25 to 1.75 inches deep) with abundant drainage holes or a food-grade mesh floor.
- Bottom reservoir tray (solid, no holes): An unperforated matching flat that sits underneath the planting tray. When it is time to water, you lift one corner of the top tray, pour clean water into the solid bottom tray, let the medium wick moisture upward for 10 to 15 minutes, and pour off any excess standing water.
- Optional third tray (inverted blackout dome): A second solid tray flipped upside down over the seeded flat for the first 2 to 4 days keeps the seed layer dark and humid during germination without buying separate flimsy domes.
You can browse Amazon search listings for reusable seed starting trays with drainage to compare shallow microgreens flats, rigid polypropylene thickness, and paired solid bottom-watering trays before ordering. For a broader comparison of how multi-cell transplant trays differ from open flats, consult our cluster pillar guide on selecting seed-starting kits and trays for spring homesteading.
2. Soilless Seed-Starting Mix vs. Hydroponic Fiber Mats
Penn State Extension and South Dakota State University Extension outline two clean substrate options for indoor microgreens:
- Fine sterile soilless seed-starting mix (peat moss or coconut coir blended with perlite/vermiculite): Holds moisture evenly across a 48-hour window and buffers against accidental drying in winter furnace air. Sift out any coarse bark chunks or sticks before filling the tray so small seeds sit on a flat, level surface. Because the seed’s own cotyledons supply all the stored energy needed for the first 10 to 14 days of growth, you do not need added compost or heavy fertilizer in the mix.
- Single-use biodegradable fiber mats (hemp, jute, coconut coir, or cellulose pads) or fine stainless mesh: Cut to fit the bottom of a shallow mesh tray, hydroponic pads eliminate loose potting mix entirely, guaranteeing zero grit on harvested greens. However, thin fiber mats hold much less water than 1.5 inches of peat/coir mix; they must be checked daily (and sometimes watered twice daily in dry winter rooms) so delicate emerging radicles do not dry out.
Never use raw outdoor garden soil or unsterilized backyard compost in indoor microgreens trays; outdoor soil compacts poorly in shallow flats and carries damping-off pathogens (Pythium, Rhizoctonia) as well as weed seeds and insect larvae.
3. Selecting Safe, Untreated Microgreens Seeds (and What Never to Grow)
Because microgreens are sown densely—often 10 to 20 times thicker than outdoor garden rows—regular 1-gram garden seed packets get expensive quickly. Buy bulk seed specifically labeled untreated and intended for microgreens or sprouting. Never use agricultural or garden seeds treated with chemical fungicide or insecticide seed coatings (often dyed pink, blue, or green).
Equally important: Never grow nightshade family crops (tomatoes, peppers, eggplants, or potatoes) as microgreens. Nightshade stems and foliage contain toxic alkaloids (such as solanine and tomatine) that are unsafe to eat. Stick to verified edible brassicas, salad greens, herbs, and legumes recommended by university extension guides:
| Beginner Speed & Group | Popular Edible Crops | Soak Seed Before Sowing? | Typical Blackout Days | Total Days to Harvest |
|---|---|---|---|---|
| Fast Brassicas (Easiest Start) | Radish, Broccoli, Kale, Red Acre Cabbage, Kohlrabi, Mustard, Mizuna, Pak Choi | No (small dry seeds; sow directly onto damp mix) | 2 – 3 days | 7 – 10 days |
| Salad Greens & Mucilaginous Seeds | Arugula, Cress, Chia, Basil | No (never pre-soak mucilaginous seeds; they form a gel coat when misted) | 2 – 4 days | 8 – 14 days |
| Large-Seeded Shoots | Dwarf Grey Sugar Pea, Speckled Pea, Black Oil Sunflower, Buckwheat | Yes (soak peas or sunflower in cool clean water for 6–12 hrs after rinsing) | 3 – 4 days (often stacked/weighted) | 10 – 14 days |
| Slow Specialty Crops | Swiss Chard, Bull’s Blood Beet, Cilantro, Dill, Fennel, Carrot | Optional brief soak for beet/chard multigerm seed balls or split cilantro | 4 – 6 days | 14 – 21 days |
Reference: Compiled from crop lists and timelines in Penn State Extension, South Dakota State University Extension, and Purdue Extension.
Step-by-Step Indoor Microgreens Workflow: Day 1 to Harvest
Follow this repeatable sequence to take a tray from dry seed to crisp winter greens in under two weeks.
Step 1: Fill, Level, and Pre-Moisten the Tray (Day 1)
- Nest your clean, sanitized perforated planting tray inside its solid bottom reservoir flat.
- Fill the top tray with 1 to 1.5 inches of pre-moistened sterile seed-starting mix (or lay a pre-soaked hydroponic fiber mat flat across the bottom).
- Use a clean piece of cardboard, a clean wooden block, or the bottom of another clean tray to tamp and level the surface gently. Do not compact the mix into a hard brick, but make sure the surface is completely flat with no deep valleys along the corners; otherwise, seeds will wash into low puddles and clump together.
Step 2: Broadcast Seed at Proper Density and Mist Lightly
- Sprinkle seeds evenly across the entire damp surface. As Penn State Extension and Purdue Extension describe, aim for an even single layer where small brassica seeds sit roughly 1/8 inch to 1/4 inch apart (about 10 to 12 small seeds per square inch, or roughly 1.5 to 2 tablespoons of broccoli/radish seed per 1020 flat), and larger seeds like peas or sunflowers sit nearly touching in a single layer without piling on top of one another. Over-seeding is the number-one trigger for stem rot because crowded seedlings trap moisture and starve each other of airflow.
- Gently press the seeds into firm contact with the damp medium using a clean flat hand or clean tray bottom. Most microgreens seeds do not need to be buried under soil; firm surface contact plus a blackout cover provides all the moisture needed, though large seeds like peas or beet seed balls can take a paper-thin dusting of fine vermiculite or sifted mix.
- Mist the seeded surface thoroughly with a clean fine-mist spray bottle filled with potable tap water so every seed coat is moistened without blasting seeds out of place.
Step 3: The Blackout Germination Phase (Days 1 to 4)
Place an inverted solid 1020 tray or opaque cover over the seeded flat and set it in a warm room (65°F to 75°F). During these first 2 to 4 days in the dark:
- Lift the cover once a day to check moisture. If the surface looks slightly dry, give it a light pass with the fine-mist sprayer; if the mix is already evenly damp, do not over-mist.
- Watch as the white radicle roots emerge, anchor into the medium, and push pale yellow-white hypocotyl arches upward.
- Know when to uncover: Remove the blackout cover as soon as the majority of seedlings have anchored their roots and lifted their stems about 0.5 to 1 inch above the soil surface (typically Day 3 for radish/broccoli, Day 4 for peas/sunflower). Leaving the dark cover on too long produces weak, tangled, excessively etiolated yellow stems that mat down when watered.
Step 4: Expose to Overhead Grow Lights and Switch to Bottom Watering (Days 4 to 10)
Once uncovered, move the tray immediately under bright light so the pale yellow cotyledons synthesize chlorophyll and turn vibrant green within 24 hours.
- Lighting setup: Although University of Illinois Extension and Purdue Extension note that a very bright south-facing window can support small hobby trays, short winter days often cause windowsill microgreens to lean sharply toward the glass and stretch. Mounting a standard T5/T8 fluorescent shop light or a full-spectrum LED bar 4 to 8 inches above the tray on a timer set for 12 to 16 hours per day produces straight, upright, thick-stemmed greens on any basement or pantry shelf.
- Bottom watering only: Once the canopy closes in after Day 4, stop overhead spraying and top watering. Wet leaves and wet stems packed tightly together invite bacterial and fungal decay. Instead, check the weight of the tray daily. When the medium needs moisture, lift one end of the perforated top tray, pour 1 to 1.5 cups of clean cool water into the solid bottom tray, let the roots drink from below for 10 to 15 minutes, and tip out any unabsorbed water so the tray never sits in a stagnant puddle.
How to Tell Healthy Root Hairs Apart From Mold (Damping-Off)
Around Day 3 or Day 4—just as you lift the blackout cover on radish, broccoli, or kohlrabi microgreens—almost every new grower sees fuzzy white strands around the base of the germinating seeds and worries that the entire tray has gone moldy. In most cases, what you are seeing is completely normal microscopic root hairs, not fungal mold.
Use this side-by-side diagnostic check from extension horticulture practice before throwing out a healthy tray:
| Observation Check | Healthy Root Hairs (Normal Biology) | Fungal Mold / Damping-Off (Pathogen Problem) |
|---|---|---|
| Exact Location | Grows exclusively outward from the main white root radicle just before the root tip enters the soil. | Spreads across the soil surface, climbs up stems, and bridges from seed hull to seed hull like a cobweb. |
| Color & Appearance | Pure bright white, uniform, microscopic fuzzy halo radiating evenly around each individual root. | Grayish-white, slimy, or cottony patches; may show tiny dark pinhead spores or water-soaked collapsing stems. |
| Response to a Light Water Mist | Gently misting the root zone causes tiny root hairs to flatten or temporarily disappear against the main root. | Misting cobwebby fungal mycelium leaves glistening water droplets beaded up on top of the web strands. |
| Odor & Plant Vigor | Fresh, earthy, or slightly peppery brassica scent; hypocotyl stems stand firm and upright. | Musty, sour, or rotting odor; seedlings wilt, pinch at the base, and collapse in circular dead patches. |
If you confirm actual fungal mold or damping-off (collapsing water-soaked stems), do not harvest from the slimy patch. Improve airflow across the shelf with a small oscillating room fan set on low, reduce seeding density on your next batch, avoid overwatering during the blackout stage, and thoroughly wash and sanitize your trays before replanting.
Safe Harvesting, Post-Harvest Handling, and Tray Sanitation
According to Penn State Extension and South Dakota State University Extension, microgreens are ready to harvest when the cotyledons (seed leaves) are fully expanded and turgid, or just as the first tiny true leaves begin to emerge between them—typically when the crop stands 1.5 to 3 inches tall (7 to 14 days after sowing for most brassicas and greens).
Follow these food-safety and quality steps at harvest:
- Let the canopy stay dry before cutting: Harvest when the leaves and stems are dry. Wet microgreens bruise easily and spoil much faster in refrigerator storage.
- Use clean, sharp scissors or a sanitized chef’s knife: Wash your hands and wash your cutting blade with hot soapy water before harvesting. Hold a small bunch of tops gently with one hand and slice cleanly across the stems 1/4 to 1/2 inch above the surface of the growing medium so no soil particles, perlite, or seed coats from the root zone are pulled into the harvest.
- Inspect, cool, and store properly: Pick out any loose seed hulls clinging to cotyledon tips. Because microgreens are delicate, they are best cut fresh right before a meal. If storing harvested greens, place them unwashed between dry paper towels in a breathable container or loosely sealed bag in the refrigerator (36°F to 40°F) and wash gently under cool running water immediately before eating.
- Reset and sanitize trays between every batch: Apart from rare exceptions like pea shoots (which may yield one smaller second cutting if nodes remain), microgreens are a single-cut crop. Once harvested, empty the spent root mat and soil into your outdoor compost pile—never reuse old microgreens soil indoors for a second batch, as decaying root mass fuels fungus gnats and root pathogens. Scrub both the perforated and solid plastic trays with hot water and dish soap, rinse clean, sanitize with a dilute household bleach solution (1 tablespoon unscented bleach per gallon of water) or food-contact sanitizer, and air-dry completely before sowing the next tray.
Frequently Asked Questions
Do microgreens need grow lights indoors, or is a winter windowsill enough?
While you can sprout a small container of fast radish or broccoli microgreens on a bright, unobstructed south-facing windowsill, short winter days and low light angles often cause windowsill microgreens to lean sharply and grow pale, spindly stems. Hanging a simple T5/T8 fluorescent shop light or full-spectrum LED bar 4 to 8 inches above the tray for 12 to 16 hours a day produces thicker, greener, upright stems in any room.
Do I need to add fertilizer when growing microgreens indoors?
No. Because microgreens are harvested at the cotyledon or first-true-leaf stage within 7 to 14 days of sowing, the seed itself contains nearly all the stored carbohydrate and mineral reserves required for that brief growth window. Growing in 1 to 1.5 inches of plain, sterile seed-starting mix watered with clean tap water is sufficient for standard 10-day crops.
Why does my radish or broccoli microgreens tray have white fuzz on Day 3?
Fuzzy white growth radiating uniformly around individual emerging roots right above the soil line is almost always healthy root hairs, which help the young seedling absorb water and anchor into the medium. True fungal mold forms irregular gray or cobweb-like strands that bridge across multiple seeds and stems, smells musty, and causes stems to turn slimy and collapse.
Will microgreens regrow for a second harvest after I cut them?
Almost all microgreens—including broccoli, radish, kale, cabbage, arugula, mustard, and sunflower—will not regrow after you slice them above the soil line, because your cut removes the single growing point (apical meristem) located between the cotyledons. Compost the spent root mat and sow a fresh tray every 7 to 10 days for a continuous winter supply.
How deep should a microgreens tray and its soil layer be?
According to Penn State Extension, microgreens only need about 1 to 2 inches of moist growing medium. Using a shallow 1.25- to 1.75-inch perforated tray nested inside a solid bottom-watering flat improves horizontal airflow across the stems and allows your scissors or knife to slide flat across the rim at harvest without scooping up potting mix.
Products in this guide
Reusable Seed Starting & Microgreens Trays
Amazon search for reusable shallow seed starting and microgreens trays. Compare tray depth, mesh or drainage slots, and matching solid bottom flats before ordering.
Find matching listings on Amazon →Search results may include other models. Check the model and size before buying.